In the fast-paced world of DevOps, the ability to deploy, manage, and scale infrastructure efficiently is paramount. Infrastructure as Code (IaC) has revolutionized how organizations approach cloud resource management, offering a level of precision, automation, and flexibility previously unattainable. Among the various IaC tools available, Terraform stands out for its simplicity, power, and versatility. Terraform allows for the declarative configuration of almost any cloud service, making it an indispensable tool in modern DevOps toolchains.
However, the true potential of Terraform is unlocked when integrated into broader orchestration and automation frameworks. This is where VMware Aria Automation enters the picture. Aria Automation enhances the capabilities of Terraform by providing advanced orchestration, management, and visualization tools. This combination not only simplifies the deployment and management of complex infrastructures but also elevates operational efficiencies to new heights.
Why Use Terraform for Deploying Resources?
Terraform's declarative configuration files offer a clear, predictable, and efficient method for deploying cloud resources. Its ability to manage dependencies and determine the optimal order of resource deployment reduces the risk of human error and ensures a smooth deployment process. Moreover, Terraform's extensive provider ecosystem allows it to manage resources across multiple cloud platforms, making it an ideal choice for multi-cloud environments.
Why Integrate Terraform with VMware Aria Automation?
Integrating Terraform with Aria Automation brings several advantages:
- Enhanced Orchestration: Aria Automation's orchestration capabilities complement Terraform's infrastructure management, enabling more complex deployment scenarios and workflows.
- Improved Efficiency: The integration simplifies the management of cloud resources, reducing the time and effort required to deploy and scale applications.
- Greater Visibility: Aria Automation provides comprehensive monitoring and visualization tools that give insights into the infrastructure managed by Terraform, facilitating better decision-making.
In this blog post, we'll explore how to seamlessly integrate Terraform into ARIA Automation. We'll cover the prerequisites, the setup process, and provide practical tips to make the most out of this powerful combination. Whether you're looking to streamline your deployment process, manage multi-cloud environments, or simply enhance your DevOps practices, integrating Terraform with Aria Automation is a step in the right direction.
What is Needed for Integrating Terraform into VMware ARIA Automation
To successfully integrate Terraform with VMware ARIA Automation, several components and prerequisites are necessary. This integration not only enhances the automation and orchestration of infrastructure deployments but also streamlines the management process across VMware environments. Here's what you'll need to get started:
Kubernetes Cluster
- Purpose: Serves as the underlying platform for orchestrating containerized applications and services. VMware ARIA Automation leverages Kubernetes for orchestrating and managing containerized workloads, making it essential for running ARIA Automation itself.
- Options: You can set up a Kubernetes cluster using various platforms. For development and testing purposes, Minikube is a great option as it runs a single-node Kubernetes cluster on your local machine. For production environments, consider more robust solutions like VMware Tanzu Kubernetes Grid (TKG) or cloud-based Kubernetes services offered by AWS, Azure, or Google Cloud.
Terraform Provider
- Purpose: Facilitates the interaction between Terraform and the VMware environment, enabling Terraform to deploy and manage resources within VMware ARIA Automation.
- Requirements: Ensure you have the appropriate Terraform provider for VMware. This could be the VMware vSphere Provider for managing resources within vSphere or other specific providers based on your VMware product suite.
Git Backend
- Purpose: Acts as the repository and version control system for your Terraform configuration files. A Git backend enables collaborative development and versioning of Terraform configurations, which is crucial for tracking changes and managing deployments.
- Recommendations: Popular options include GitHub, GitLab, and Bitbucket. Choose a Git service that integrates well with your existing workflows and offers the features your team needs, such as branch protection, pull requests, and CI/CD pipelines.
Additional Considerations
While the above components are essential, integrating Terraform into VMware ARIA Automation also requires a solid understanding of both Terraform and VMware ARIA Automation's capabilities. Familiarity with VMware's cloud infrastructure, network configurations, and security practices is crucial for a successful integration. Additionally, ensure that you have the necessary access permissions and API keys for both Terraform and VMware ARIA Automation to interact with your cloud resources and services.
In the following sections, we will dive deeper into setting up these components, configuring them for optimal integration, and deploying your first resources with Terraform through VMware ARIA Automation.
Setting Up Minikube on Top of Docker
Minikube is an excellent tool for creating a local Kubernetes cluster for development and testing purposes. It's particularly useful when integrating Terraform with VMware ARIA Automation, as it allows developers to test their infrastructure as code configurations in a controlled environment. Below, we detail the steps to set up Minikube on Docker, making it accessible to your VMware ARIA Automation host.
Prerequisites
- Docker: Ensure Docker is installed and running on your machine. Minikube will use Docker as the driver to create the Kubernetes cluster.
- kubectl: The Kubernetes command-line tool,
kubectl, is necessary to deploy and manage applications on Kubernetes. Ensure it is installed to interact with your Minikube cluster. - Minikube: Download and install Minikube from the official Minikube releases page.
Installation Steps
-
Start Minikube with Docker Driver:
To start Minikube with Docker as the driver, run the following command in your terminal:
minikube start --driver=dockerThis command initializes a single-node Kubernetes cluster running inside a Docker container. If Docker is not running, Minikube will prompt you to start the Docker service.
-
Verify Cluster Status:
After starting Minikube, verify that the cluster is up and running with:
minikube statusThe output should indicate that Minikube is running, along with the status of the kubelet and other components.
-
Accessing the Kubernetes Dashboard:
Minikube comes with a built-in dashboard for managing your Kubernetes cluster. To access it, use:
minikube dashboardThis command will open the Kubernetes dashboard in your default web browser, providing a GUI for cluster management tasks.
Configuring Minikube for Public Access
By default, Minikube and its services are only accessible from the local machine. To make Minikube publicly accessible to your VMware ARIA Automation host, follow these steps:
-
Enable Ingress:
First, enable the Ingress controller in Minikube to manage external access to the services in your cluster:
minikube addons enable ingress -
Retrieve the Minikube IP Address:
Use the following command to find the Minikube IP address:
minikube ipThis IP address will be used to access the Kubernetes services from external sources.
-
Configure DNS or Host File:
To make the Minikube cluster accessible by hostname from the VMware ARIA Automation host, you can add an entry in the
/etc/hostsfile of the ARIA Automation host, mapping the Minikube IP to a hostname.<minikube-ip> myminikube.local -
Firewall and Network Security:
Ensure that any firewalls between the VMware ARIA Automation host and the Minikube cluster are configured to allow traffic on the necessary ports. This may involve configuring firewall rules to allow inbound and outbound traffic for Kubernetes service ports.
Next Steps
With Minikube running on top of Docker and configured for public access, you're now ready to integrate it with VMware ARIA Automation. This setup provides a robust environment for developing and testing Kubernetes deployments with Terraform configurations.
In the following sections, we will explore how to add Minikube as a resource provider in VMware ARIA Automation and deploy your first resources using Terraform.
Hosting the Terraform CLI Locally
To ensure seamless integration and operation of Terraform within VMware ARIA Automation, hosting the Terraform CLI locally is a crucial step. Here's how you can do it:
-
Download the Terraform CLI Binaries: Start by downloading the appropriate version of the Terraform CLI binaries from the official Terraform website.
-
Upload the Binaries to Your Local Server: Once downloaded, upload the binaries to your local web or FTP server. This server will host the binaries for VMware ARIA Automation to access.
-
Configure Terraform Versions in Automation Assembler:
- Navigate to
Infrastructure > Configure > Terraform Versionswithin the Automation Assembler. - Here, you can create a new Terraform version or edit an existing one. Ensure to include the URL to the Terraform CLI binaries hosted on your local server.
- If your server requires login authentication, select
Basic authenticationand provide the necessary username and password credentials.
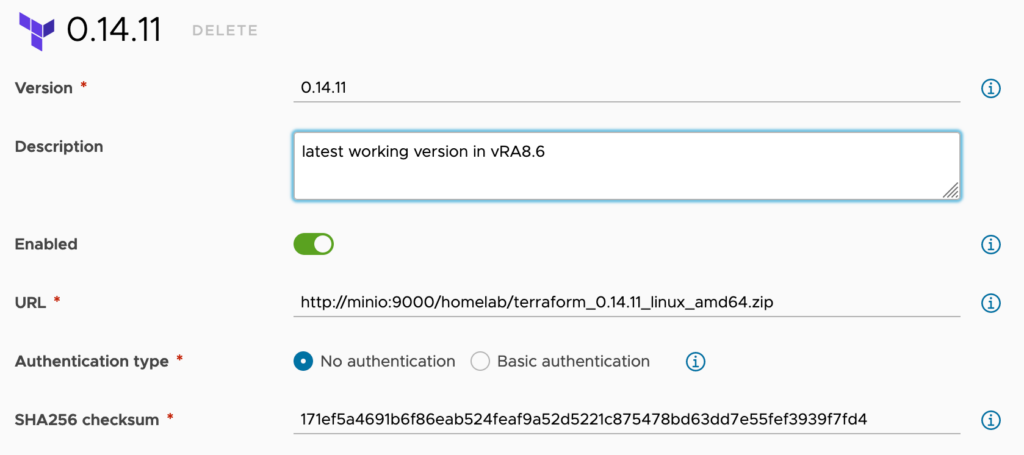
- Navigate to
Note: Changing the authentication type requires cloud administrator role permissions in Automation Assembler.
Troubleshooting the Terraform Runtime
Encountering issues with Terraform configuration deployments can often be traced back to runtime integration problems. Here are some common issues and their solutions:
Common Problems and Resolutions
-
Validation Fails Due to Invalid Namespace:
- Cause: Modifying the cluster without updating the namespace in the UI.
- Resolution: Always reselect a namespace after modifying the cluster selection to ensure it's valid.
-
Namespace Dropdown Issues:
- Cause: Delayed data collection for clusters or namespaces.
- Resolution: Data collection may take up to 5 minutes for clusters and up to 10 minutes for namespaces. If newly added namespaces don't appear, wait for the data collection process to complete. For persistent issues, try removing and re-adding the cluster under
Infrastructure > Resources > Kubernetes.
-
Terraform CLI Containers Use Previous Settings:
- Cause: The Kubernetes API client cache used by VMware Aria Automation.
- Resolution: After making integration account updates, allow up to 5 minutes for changes to take effect due to caching.
-
Failures Indicating Kubeconfig Unavailability:
- Causes and Resolutions: These errors can stem from unreachable clusters, or invalid user credentials, tokens, or certificates. The issue might require deeper investigation and potentially engaging VMware technical support for resolution.
These troubleshooting steps can help address common runtime integration issues, ensuring smoother Terraform deployments within VMware ARIA Automation.
Setting Up a Git Repo for Terraform in VMware ARIA Automation
Integrating Terraform with VMware ARIA Automation involves managing your Terraform configuration files within a version control system. This setup enhances collaboration, versioning, and the deployment process. Follow these steps to set up a Git repository for Terraform configurations in VMware ARIA Automation.
Prerequisites
Before you begin, ensure that the Terraform runtime integration is configured within your VMware Aria Automation on-premises product. Refer to the "Preparing an Automation Assembler Terraform runtime environment" documentation for detailed instructions.
Store Terraform Configuration Files in a Version Control Repository
VMware ARIA Automation's Automation Assembler supports Terraform configurations stored in various version control repositories, including:
- GitHub (cloud and Enterprise on-premises)
- GitLab (cloud and Enterprise on-premises)
- Bitbucket (on-premises)
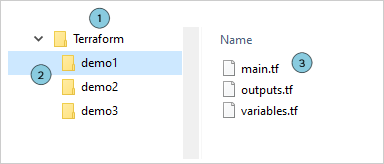
Within your chosen version control repository, organize your Terraform configurations as follows:
- Create a Default Directory: This directory will act as the root for your Terraform configurations.
- Single Subdirectory Layer: Within the default directory, create subdirectories, each containing a unique Terraform configuration. This structure ensures that each configuration is isolated and manageable.
- Deployment-ready Terraform Configuration Files: Include all necessary
.tffiles for your infrastructure as code. Do not include a Terraform state file (terraform.tfstate) within these directories, as its presence can cause deployment errors.
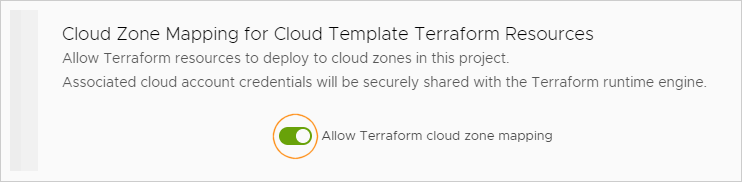
Enable Cloud Zone Mapping
If your deployments target cloud accounts, ensure the Terraform runtime engine has access to the necessary cloud zone credentials:
- In the project's Provisioning tab, enable Allow Terraform cloud zone mapping.
- While credentials are securely handled, it's recommended to activate this option only if necessary for cloud deployments, to enhance security.
Integrate Your Repository with Automation Assembler
- In Automation Assembler, navigate to
Infrastructure > Connections > Integrations. - Add an integration for the repository type where your Terraform configurations are stored (GitHub, GitLab, or Bitbucket).
- When adding your project to the integration, select the Terraform Configurations type. Specify the repository and branch where your Terraform files are located.
- For the Folder field, input the path to your default directory as outlined in your earlier repository structure setup.
By following these steps, you effectively integrate your Git repository with VMware ARIA Automation, making it ready for managing and deploying Terraform configurations. This setup streamlines the deployment process and facilitates efficient infrastructure management.
How VMware ARIA Automation Reads Repositories and Creates Designs
Understanding how VMware ARIA Automation interacts with version control repositories to read Terraform configurations and transform them into deployable designs is crucial for effective infrastructure automation. This process enables the seamless transition from code to deployment, leveraging the power of Infrastructure as Code (IaC) for efficient infrastructure management.
The Process
-
Repository Integration: Initially, VMware ARIA Automation needs to be integrated with your version control system, as described in the previous section. This integration allows ARIA Automation to access Terraform configuration files stored in repositories such as GitHub, GitLab, or Bitbucket.
-
Configuration Reading: Once integrated, ARIA Automation periodically scans the connected repositories for changes to Terraform configurations. This scanning process includes detecting new commits or branches that may contain updated or new Terraform configurations.
-
Design Creation: Upon detecting Terraform configurations, ARIA Automation evaluates them to create corresponding designs within the ARIA Automation platform. These designs are essentially templates that can be used to deploy the defined infrastructure. The creation process involves parsing the Terraform configuration files (.tf files) to understand the infrastructure components they define, such as virtual machines, networks, and other resources.
-
Parameter Mapping and Customization: ARIA Automation also maps variables defined in Terraform configurations to parameters within the design. This mapping enables users to customize deployments by providing values for these parameters at deployment time, rather than hardcoding them into the Terraform configuration files.
-
Deployment Readiness: Once designs are created and parameters are mapped, the designs are ready to be deployed. Users can initiate deployments directly from the ARIA Automation platform, supplying any required parameters to configure the deployment as needed.
Best Practices
- Organized Repository Structure: Maintain an organized structure within your version control repository to facilitate easy reading and parsing by ARIA Automation. As recommended, use a default directory with a single subdirectory layer for each Terraform configuration.
- Clear Configuration Naming: Use clear and descriptive names for your Terraform configuration files and variables. This practice aids in the mapping process and enhances the usability of the designs within ARIA Automation.
- Version Control: Regularly commit and push changes to your version control system to keep your designs up to date in ARIA Automation. This practice ensures that your deployments always use the latest configurations.
By following these guidelines and understanding the process, you can leverage VMware ARIA Automation to efficiently manage and deploy your infrastructure using Terraform configurations stored in version control repositories.
Designing an Automation Assembler Template with Terraform Configurations
Harness the power of VMware Aria Automation by integrating Terraform configurations into your infrastructure management workflow. This guide walks you through setting up a Git repository for Terraform and creating a cloud template in Automation Assembler.
Prerequisites
- Set Up and Integrate Your Version Control Repository: Ensure your version control repository is ready and integrated. See "Preparing for Terraform configurations in Automation Assembler" for setup details.
Enable Terraform Runtime Versions
Define the Terraform runtime versions available for deploying configurations, keeping in mind that Terraform configurations may include internal version constraints.
- Navigate to
Infrastructure > Configure > Terraform Versionsto create a list of allowable versions.
Add Terraform Resources to the Design
Craft a cloud template that encapsulates your Terraform configurations:
-
In Automation Assembler, head over to
Design > Cloud Templatesand selectNew from > Terraformto launch the configuration wizard. -
Wizard Configuration:
- Name: Assign a unique identifying name to the design.
- Description: Describe the purpose of the design.
- Project: Choose the project encompassing the repository integration with your Terraform configuration.
- Configuration Source: Opt for the repository where your Terraform configuration resides.
- Commit: Select a specific repository commit for the Terraform configuration, or default to the repository head.
- Source Directory: Pick a subdirectory, such as demo1, demo2, or demo3, that houses your Terraform configuration.
-
Finalize Configuration:
- Confirm the repository and directory selections.
- Choose the Terraform version for deployment.
- If available, verify and configure the provider and cloud zone details.
- Select sensitive variables for encryption and verify outputs that will be referenced in the design.
-
Click
Create. This action generates a Terraform resource on the cloud template canvas, reflecting the deployment configuration.
Deploy the Cloud Template
Deploying your cloud template allows for the inspection of Terraform CLI messages during phases such as PLAN, ALLOCATE, or CREATE. Governance features like approval phases can be configured for enhanced control over deployments.
Considerations and Limitations
- Terraform Configuration Updates: Modifications to Terraform configurations in the repository are not automatically synchronized to your cloud template. To update, rerun the wizard with the new commit details.
- Limitations for Terraform Configurations: The TEST button checks Automation Assembler syntax but not Terraform code syntax directly. Commit IDs associated with Terraform configurations are not validated by the TEST action.
- Supported Day 2 Actions: Details on supported actions for both parent and child resources are pivotal for managing lifecycle and operational tasks.
Using Custom Terraform Providers
To incorporate custom Terraform providers, structure your Git repository accordingly, placing the provider ZIP file under terraform.d/plugins/ with the correct naming convention.
This guide sets the foundation for integrating Terraform with VMware Aria Automation, streamlining your infrastructure management and deployment processes.
Example Terraform Configuration for Deploying to vSphere
Deploying infrastructure to vSphere using Terraform can significantly streamline your operations. Below is an example Terraform configuration that demonstrates how to provision virtual machines on vSphere. This example uses various resources, including datastores, compute clusters, and networks, to deploy a VM based on an Ubuntu template.
Key Configuration Elements
- vsphere Provider: Configures the vSphere provider to interact with your vSphere environment.
- Data Resources: Retrieves information about the datacenter, datastore, compute cluster, and network to be used for VM deployment.
- Virtual Machine Resource: Defines the VM to be created, including its CPU, memory, disk, and network interface configurations.
Terraform Configuration
This example focuses on the practical application of Terraform for VM provisioning in a vSphere environment. It includes resource definitions for pulling an Ubuntu image and configuring network settings for the newly created VM.
To view the complete Terraform configuration, visit the following GitHub link:
Example Terraform Configuration for vSphere - ubuntu.tf
This configuration serves as a template for deploying virtual machines to vSphere with Terraform. By customizing the provided example, you can adapt it to fit your specific deployment needs and infrastructure requirements.
Utilization Guide
To use this configuration:
- Ensure you have Terraform installed and configured with access to your vSphere environment.
- Download the
.tffile from the provided GitHub link. - Update the configuration with your specific environment details, such as the vSphere server, datacenter, datastore, network, and virtual machine settings.
- Run
terraform initto initialize the Terraform working directory. - Apply the configuration with
terraform applyto create the resources in your vSphere environment.
This example demonstrates the power and flexibility of Terraform for infrastructure management and deployment in vSphere environments.
Tips and Tricks for Terraform
Maximizing efficiency and understanding best practices can significantly enhance your Terraform usage. Here are some tips and tricks for working with Terraform more effectively:
1. Use Modules to Reuse Code
Modules allow you to encapsulate and reuse code for similar infrastructure setups. Define common configurations as modules and reference them in your main Terraform files to avoid duplication and simplify maintenance.
2. Leverage the Terraform Registry
The Terraform Registry is a vast repository of modules and providers that can speed up your project setup. Explore community modules for common infrastructure patterns and services.
3. Keep Your Terraform State Secure
The Terraform state file contains sensitive information and should be handled with care. Use remote state backends like AWS S3 with encryption and versioning enabled to store your state file securely.
4. Implement Workspaces for Environment Management
Terraform workspaces allow you to manage separate state files for different environments (e.g., development, staging, production) from the same configuration, making it easier to manage and isolate resources.
5. Use Terraform Linters
Tools like tflint help identify potential issues with your Terraform configurations before you apply them. Incorporate linting into your CI/CD pipeline to catch errors early.
6. Plan Carefully and Apply with Caution
Always run terraform plan before terraform apply to preview the changes Terraform will make to your infrastructure. This step can prevent unexpected changes and potential disruptions.
7. Automate Terraform with CI/CD Pipelines
Integrate Terraform into your CI/CD pipelines for automated testing and deployment. Tools like Jenkins, GitLab CI, and GitHub Actions can automate Terraform plan and apply steps based on specific triggers or schedules.
8. Version Pin Your Providers and Modules
To ensure consistency and prevent unexpected changes, pin the versions of your Terraform providers and modules. Use the version argument to specify the exact versions you want to use.
9. Securely Manage Secrets
Avoid hardcoding sensitive information in your Terraform configurations. Use secret management tools like HashiCorp Vault or integrate with your cloud provider's secrets manager to inject secrets dynamically.
10. Document Your Configurations
Good documentation supports your team in understanding and maintaining your Terraform configurations. Comment liberally within your .tf files and maintain a README with high-level details about your project setup.
By incorporating these tips and tricks into your Terraform workflow, you can improve your infrastructure management practices, enhance security, and support collaboration across your team.